|
| Students used a variety of techniques to create their unique assemblages. |
Valley View Middle School was reconstructed eight years ago, making it eligible for public art sculpture. Although students have walked by this sculpture hundreds of times, they admittedly have never really regarded or even thought much about it. Having a prominent artwork in our own backyard serves as a gateway for teaching my students about sculpture.
Introducing Sculpture
To introduce the sculpture to my 3D Art class, we view different perspectives of the sculpture Visual Dialogue, share insights of possible meanings behind the tall steel triangular prisms and detached “chair,” and explore the interactive positive and negative space the sculpture invites. Besides being an exciting introduction to sculpture, this is new learning for my seventhgraders, as the course 3D Art is the first visual art class for the majority of my students.
Design
After exploring and learning about the sculpture, we use the following guiding question to define the purpose of the project: How might we assemble triangular pyramids to construct a 3D relief or hanging sculpture? In place of exploring a sculpture, students could work in groups to engage with geometric solids or small-scale triangular pyramid paper templates (cut and tape).
Techniques for Surface Enhancement
On an 8 x 10" (20 x 25 cm) sheet of watercolor paper, students draw a grid with two columns and four rows, labeling each box with the following watercolor techniques: dry brush, wetthem a try. This is a fun and engaging way to introduce students to the possible effects watercolor can provide. Students can then make informed choices for their pyramid surfaces. I encourage students to choose on-wet, wax resist, rubbing alcohol, salt, bubble wrap/scrunched-up wax paper, watercolor pencil, and splatter/ spray liquid watercolor. Each technique is demonstrated, and materials are passed around so students can give three favorite techniques. Patterning in black permanent marker looks incredible for this project and brings in another element of art. This project also works using markers, colored pencil, and/or gel pens on cardstock.
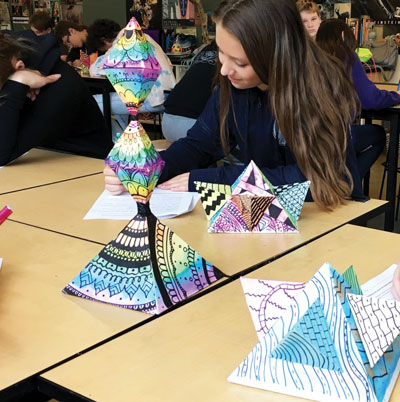 |
| A student writes a statement about her sculpture. |
Templates and Process
Each student will construct one large triangular pyramid with a square base and four smaller pyramids with triangular bases. To save time, I created cardboard templates for the triangular pyramids for students to use. The large pyramid has a 6" (15 cm) square base, with a 6" height for the triangular faces, and ½" (1.25 cm) tabs on alternating sides. The two small pyramids have a triangular base and faces with a 3" (7.5 cm) median, and ½" tabs on alternating sides.
Students trace the pyramids on heavy watercolor paper. It’s helpful for students to draw dotted fold lines after tracing around each template. The pyramids are cut out and the sides and tabs are firmly folded (firm folds are critical—using scissor handles for creasing helps), and then glued into 3D forms. Tacky glue works best, along with small pieces of masking tape, to hold the pyramids in place. Students can now experiment with assembling the pyramids together and decide whether to assemble a 3D in-the-round, relief, or hanging sculpture. When ready, students glue the parts together and display.
Mari Atkinson is an art teacher at Valley View Middle School in Snohomish, Washington. maribethmba@gmail.com
NATIONAL STANDARD
Creating: Organize and develop artistic ideas and work.
WEB LINK
Visual Dialogue: bit.ly/2HkUsg9
View this article in the digital edition.