Structure

Classroom Setup to Support Learning

posted on Nov 8, 2019

I have a brand-new classroom this school year. This is the fifth time in seven years that I’ve moved rooms, and I’m delighted with my new space because it’s beautiful and it’s mine for the foreseeable future, which means that I can really settle down and make it my own.


Classroom Setup to Support Learning

As a Teaching for Artistic Behavior (TAB) teacher, I knew that when I set up my room, I wanted to inforfocus on putting elements in places that allow students to use them independently, as in getting materials out and putting them away on their own. The idea is that the classroom is the students’ studio, and a big part of my role is teaching them how to use and maintain it. Thoughtful room setup is essential in making this happen. Here are four tips for putting together a space that supports student-directed learning:

  1. Visible Structure
    It’s essential that students are able to locate supplies on their own. In the past, this hasn’t happened as well as I wanted it to, so this year I took advantage of open shelving and wall space above my storage area to make signs and display supplies that made it absolutely clear what materials are where. Areas where supplies are grouped are called centers. Because supplies are so visible in these centers, students don’t even need to stop and read the text to understand what general area they need to be in to get what they’re looking for.
  2. Clear Labels
    It’s important for students to know what’s what as they start to figure out how the studio is set up. Clear labels on the outside of shelves and drawers help with locating materials as well as putting them away. I use painter’s tape and a thick permanent marker, even adding labels to the inside of storage areas to make finding supplies and putting them back in the right space as easy as possible.
  3. Visual Supports
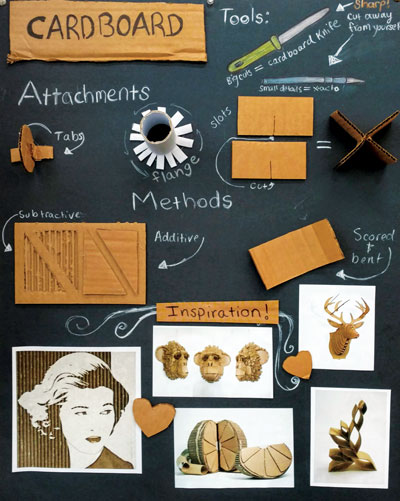
    I’ve embraced the TAB concept of the classroom as a second teacher (which was influenced by Reggio Emilia). I’ve been setting up informational visuals in my centers that describe essentials about media and technique in poster form. I know these are working because students are using them to start exploring media on their own.
  4. Digital Centers
    Of course, in a high-school artroom, there are more media and processes available than can fit of the wall space of any classroom. To help get information to students, I’ve added digital centers to my class website. The information is broken down into short activities that ask students to explore materials, then make a work of art that demonstrates their new knowledge. I started the school year by doing a week of whole group instruction, then introducing four processes on my digital drawing center. I add more content every week, slowly introducing a large collection of ways to make art that are available in my room.

So far, this all is working beautifully. Students are working through online content in a self-directed, self-paced fashion, as well as successfully using the studio. I looked around yesterday and saw students drawing, others using pen and ink or painting, and a group over by the counter tie-dying—all processes they’d learned on their own.

Melissa Purtee is an art teacher at Apex High School in Apex, North Carolina, and co-author of The Open Art Room, available from Davis Publications.

WEB LINKS
Teaching for Artistic Behavior: TeachingForArtisticBehavior.org

View this article in the digital edition.