In years past, for the last quarter of the school year, I assigned students in my drawing, painting, and printmaking classes one final project that was ambitious and appropriately demanding, usually a large acrylic painting. I was never satisfied with all of the results because some of the work was rushed or incomplete. I decided to reverse that approach and assign a small work in a series of steps that would accommodate our class periods, which are shortened for two weeks in May due to state standards testing.
At the suburban high school where I teach, my colleagues and I are engaged in an escalating struggle with students who don’t feel any urgency to complete their work. These students represent a small but troubling minority.
I found one solution by accident. In years past, for the last quarter of the school year, I assigned students in my drawing, painting, and printmaking classes one final project that was ambitious and appropriately demanding, usually a large acrylic painting. I was never satisfied with all of the results because some of the work was rushed or incomplete.
I decided to reverse that approach and assign a small work in a series of steps that would accommodate our class periods, which are shortened for two weeks in May due to state standards testing.
A Student’s Influence
Inspired by a small but effective artwork that Lydia Nortonen, one of my AP Studio students created, I came up with the studio lesson I call “Prepare Yourself.” Lydia created a prepared ground on a mat board support using torn newspaper collage that she stained with coffee. She then drew on tag board a trio of objects from a large classroom still-life setup, cut them out, glued them onto her ground, and unified foreground and background with black and white lines, both solid and broken, and stenciled text.
Not wanting to copy her approach, I devised a different prepared ground that would unfold in a series of steps that could be completed one or two at a time, depending on how long each block was during our state standards testing.
Gathering Materials
After matting all of the work for end-of-year shows, I had an abundance of mat scraps on hand, so I decided to use that as our support, cutting it into 9 x 12" (23 x 30 cm) pieces. We also keep on hand a variety of black permanent markers, and by year’s end, we had quite a selection of custom-colored tag board that we used to clean our brayers. We let them dry and put them in a bin for future use.
A Step-by-Step Process
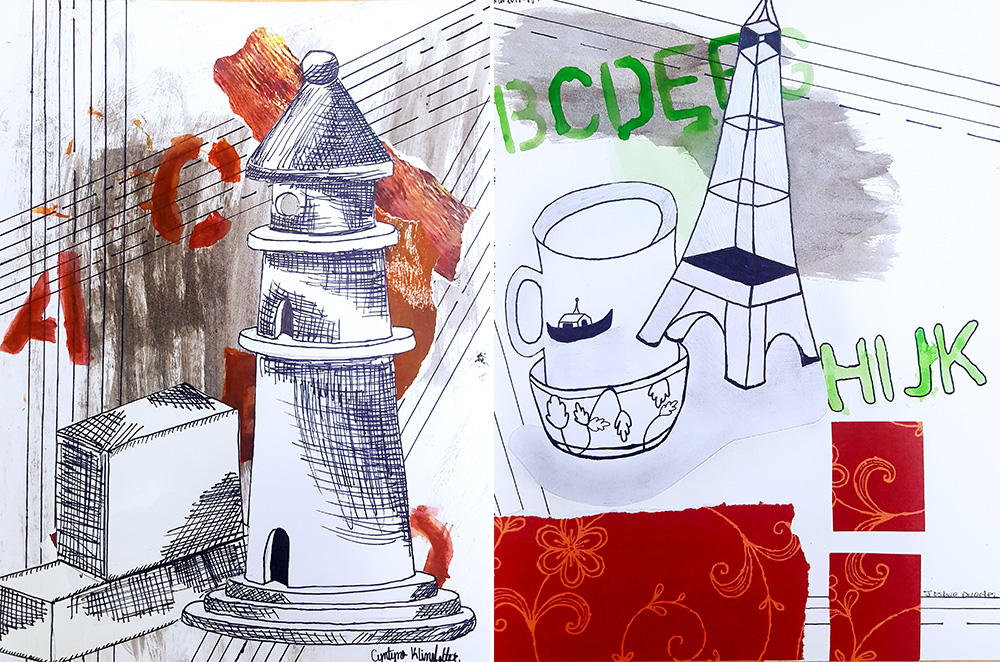
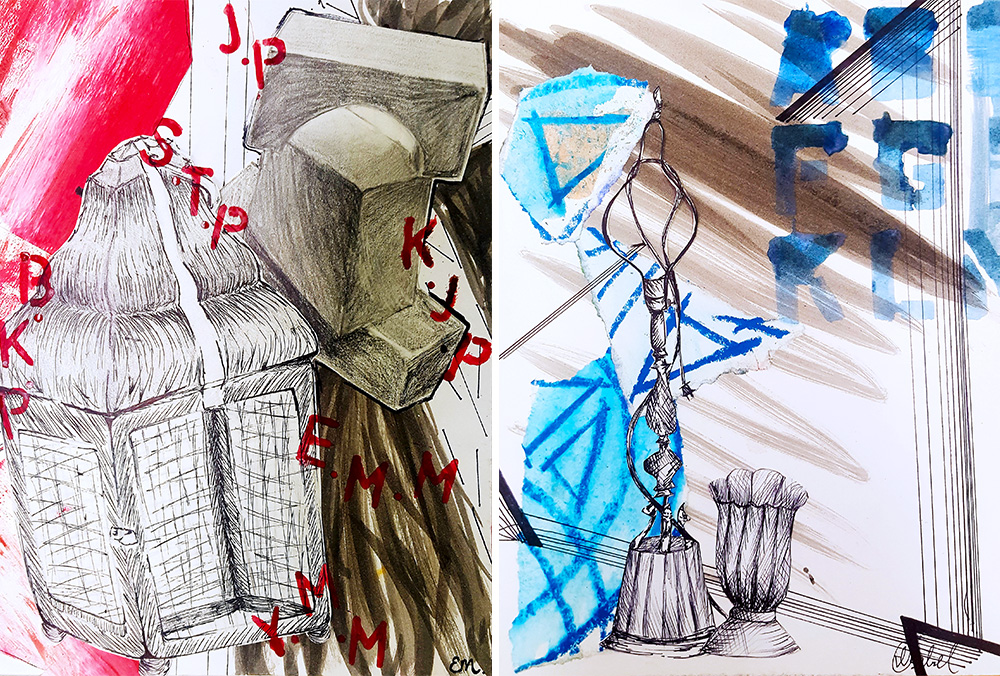
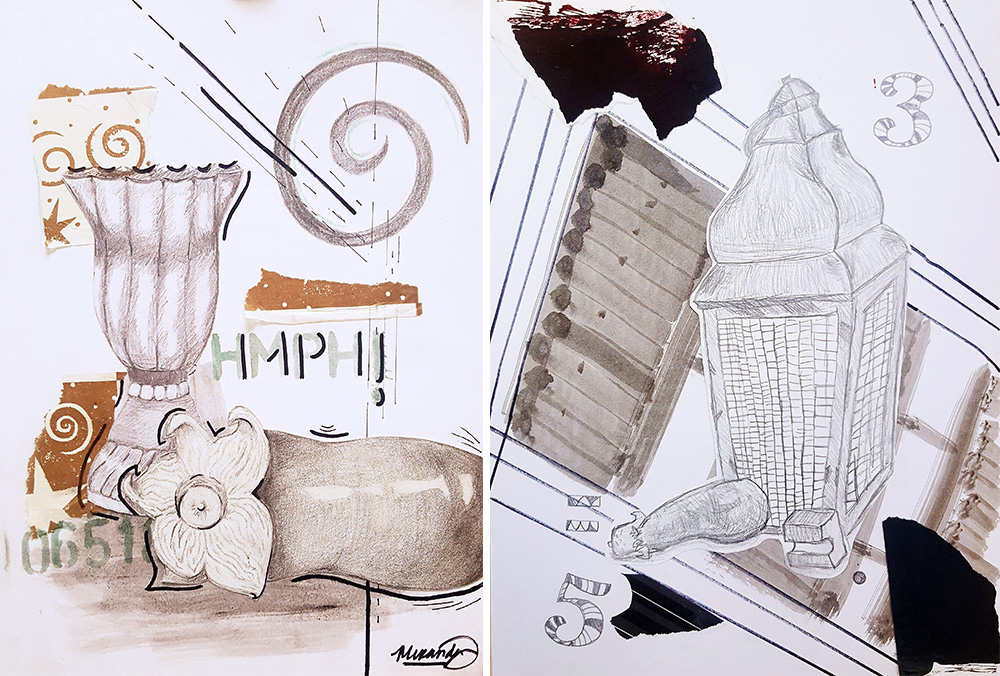
The first step was for each student to use a straightedge and a marker to create a pattern of lines on their mat board. I explained that they could interpret “pattern of lines” however they wanted. For example, they could draw three parallel lines down one side or an intricate web of lines covering the entire surface.
The next step was to create one area of diluted India ink wash somewhere on the mat board, preferably not in the center. Again, students interpreted this prompt in a variety of ways. Next, I asked them to retrieve a piece of the tag board from the bin and collage three pieces of it somewhere on their ground. The pieces could be cut, torn, small, large, or a combination.
Then I asked students to use a compatible color of watercolor to stencil on letters, numbers, or symbols, strictly as design elements and not as text-based messages. Watercolor may seem an odd choice, but I wanted the results to be loose and imprecise compared to the straight black lines and edges of the collaged paper. In the end, two of the prompts resulted in hard-edged components and two in loose edges.
I created a large still-life setup in the classroom full of incongruous objects with contrasting sizes and forms. The last step was for students to draw three objects from it on the tag board with graphite pencil, ink pen, or permanent marker, cut them out, and glue them onto their prepared grounds. If they chose, they could make final tweaks to better integrate the drawings with the grounds. At the conclusion of this process, I would gratefully discover that the artworks created by my fifty students were 99% successful and complete.
Results
I described this approach to David Prescott, a trusted colleague and our department chair, and he asked what prevented it from being “cookie-cutter” art. Fair question, but he hadn’t seen the finished work.
I explained as students progressed, I would expect them to create prepared grounds and complex compositions on their own through a variety of individual means. But at this intermediate level, a chronological series of open-ended prompts was appropriate, as students could interpret what Jasper Johns called “commands” in unlimited ways. As is so often the case with work that is the same size and made from the same materials, there is what I call a “whatness” about them. But within those parameters, there was a dramatic range, as my colleague would soon agree.
When I showed him the diverse range of responses in the completed works, he quickly became a believer. And when I showed him the specific results of someone who was failing the course, mostly because of unfinished work, my colleague was astonished. A small number of students who struggled to complete their artwork throughout the year were able to complete this creative challenge and produce work at a high level of competency.
Betsy DiJulio is a National Board Certified art teacher at Norfolk Academy in Norfolk, Virginia. BDiJulio@NorfolkAcademy.org
National Standard
Creating: Organize and develop artistic ideas and work.
Art teachers share lessons that focus on student choice and Teaching for Artistic Behavior. Students use an everyday material to express their ideas in 2D and 3D form, experiment with digital drawing apps to alter self-portrait images through collage, engage in discussions about race and identity during a color-mixing exploration, participate in hands-on learning stations to investigate symmetry, and more.