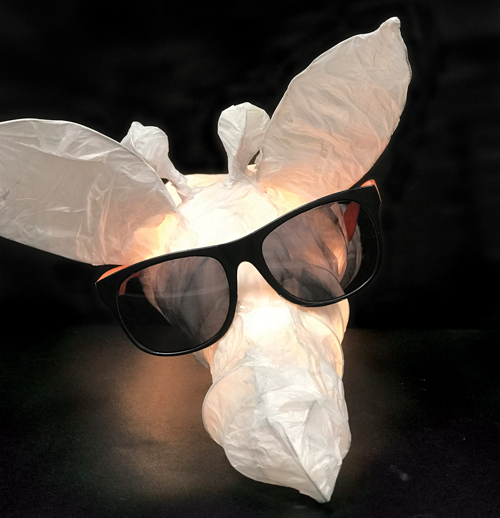
Scrolling through Pinterest a few summers ago, I came across a lantern sculpture project that was whimsical, beautiful, and often abstract. I researched how to build these sculptures and, surprisingly, there were few resources. Summer ended, the school year began, and this project was put on hold—until I came across an after-Christmas clearance sale at one of the big-box retail stores. I found boxes of 5' (1.5 m) strands of clear lights on sale for fifty cents each. I immediately thought of the lanterns and purchased all of the boxes. Three years after purchasing the light strands, I came across the dog sculptures of artist Marie-Astrid Montagnier and decided to have one of my Art 1 classes experiment with a process similar to hers. Finally, I had found a way to make my lantern vision come to light.
Time Reveals a Lesson
Three years after purchasing the light strands, I came across the dog sculptures of artist Marie-Astrid Montagnier and decided to have one of my Art 1 classes experiment with a process similar to hers. I was full of excitement! Finally, I had found a way to make my lantern vision come to light.
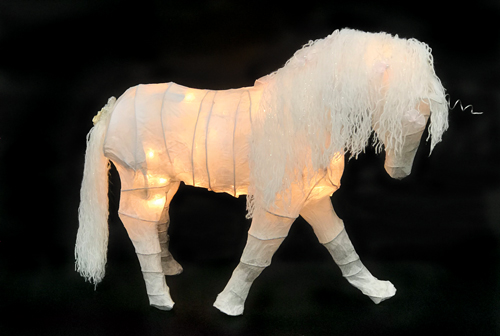
We spent a month creating these sculptures. Students grumbled about how challenging the work was, but in the end, the results were stunning.
Working with Wire
Before students began, I demonstrated how to twist the wire around itself and how to attach wire pieces by squeezing the wire tight with pliers. If students had difficulty doing this, they could use a small amount of florist wire to attach the larger wire pieces together (just make sure any loose wire ends are pointing into the sculpture). All of the wire will show through at the end, so it’s important to make sure the armature is aesthetically pleasing.
Creating the Armature
I explained how the wire armature would be similar to contour line. Students drew the outline of their chosen animal on a sheet of paper, then they laid the wire on the outline and bent it to match the shape. If needed, they could use tape to hold the wire in place while bending it into the main outline.
Wrapping the Armature
The next step was to wrap the wire in concentric circles around the armature. Some students would only get enough wire to attach one circle at a time, while others would get a 2 to 3' (0.5 to 1 m) length of wire and wrap it continuously around the main shape. As students worked, I asked them to focus on dimensions, checking if an area should be larger or smaller than the previous section and adjusting their wire to mimic this. I encouraged them to observe their armature from different angles to ensure it was shaped correctly.
Any time wire was being used at a table, all students at the table were required to wear safety goggles. The wire tended to whip around and move fast, and I didn’t want any eye injuries. Be sure to also keep gloves and bandages available as there may be some minor cuts while students are learning to manipulate the wire.
Adding Papier-Mâché
Using white tissue paper, students first cut the paper into 2 to 3" (5 to 7.5 cm) strips about 1" (2.5 cm) wide. Using only their fingertips, they wrapped one end of the tissue paper around an armature wire, secured it with a small amount of papier-mâché paste, carefully stretched the rest of the dry tissue paper strip to the next closest wire, wrapped the end of the paper around it, and “glued” it together with additional paste. After applying three to four pieces of tissue paper, students gently rubbed papier-mâché paste onto the dry areas of the attached tissue paper. Only one layer of tissue is needed. Additional layers will lessen the amount of light that will shine through.
Students papier-mâchéd everything but the belly of their animal. Once the paper was dry, they placed the lights inside, leaving the plug of the light cord hanging out. The last step was to papier-mâché the belly closed around the cord. I encouraged students to add a decorative base to their projects. These were created with cardboard, masking tape, papier-mâché, and acrylic paint.
Sculpture Materials
electric fence wire spool
cardboard
silver florist wire
masking tape
needle-nose pliers
craft knives
safety goggles
papier-mâché paste
gloves and bandages
acrylic paint and brushes
white or colored tissue paper
one strand of lights per student
Cara Wade is an art teacher at Gunter High School in Gunter, Texas. CWade@GunterISD.org
National Standard
Creating: Organize and develop artistic ideas and work.
Art teachers introduce the concept of structure with 3D art, assemblages, and architecture. Young students use empty boxes to build an in-class art museum, elementary students embrace design-level thinking while using found objects to create personalized theme parks, middle-school students use printmaking and mathematical concepts to create 3D hanging sculptures, high-school students demonstrate three types of framing in surreal photographs inspired by Ralph Eugene Meatyard, and more.