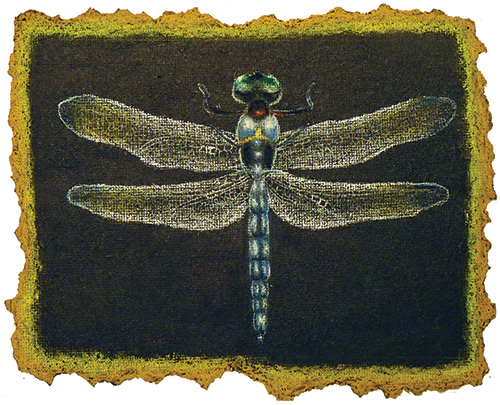
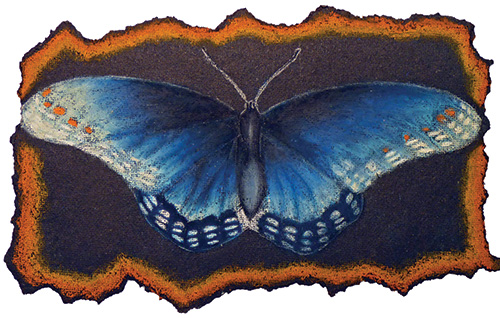
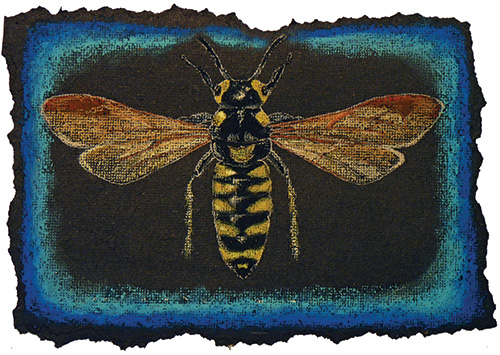
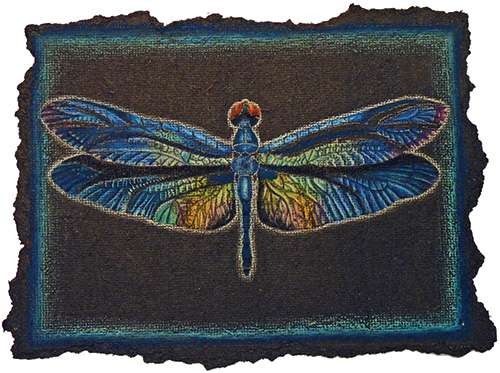
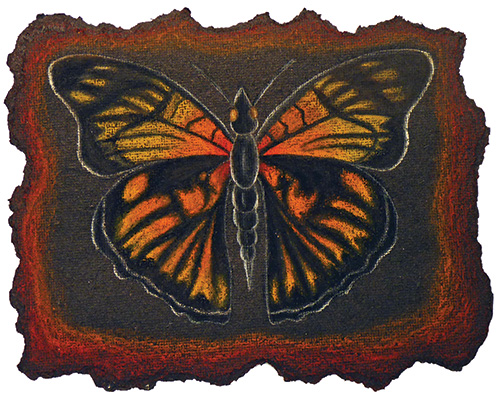
I needed to find subject matter that would interest my eighth-graders and, at the same time, utilize the natural torn edges of roofing felt. The irregular shape seemed ripe for some form of nature study. After seeing some images on the internet of the amazing color range of insects, I made the connection. I then tested oil pastels and soft core colored pencils on the felt and realized I had the perfect combination to capture the beauty of the insect world.
Lexie B.Jaden.Michael L.Melissa W.Vivian Y.
Several years ago, I attended a workshop at our annual state conference where a veteran art educator demonstrated the use of ordinary roofing felt as a support for painting and drawing projects. After a few minutes, I fell in love with its highly textured surface and the wonderful visual effect when the felt’s edges are torn. The fact that it was black added another fabulous dimension.
With the workshop in mind, I needed to find subject matter that would interest my eighth-graders and, at the same time, utilize the natural torn edges of roofing felt. The irregular shape seemed ripe for some form of nature study. After seeing some images on the internet of the amazing range of color found in insects, I made the connection. I then tested oil pastels and soft core colored pencils on the felt and realized I had the perfect combination to capture the beauty of the insect world.
Searching for Bugs
I introduced students to the unusual support they’d be using. I flexed a piece of the roofing felt, while telling them it was made with tar, and explaining what it was actually used for. I then tore off an edge to show them how cool the effect looked. I had a roll of roofing felt donated by a colleague and it was highly textured and very black. I highly recommend this type; many rolls I have seen at home improvement stores turn slightly brown and lack texture.
Students were intrigued by the roofing felt, but when I told them the subject they would be drawing was insects, many students uttered, “Ew, bugs.” After I showed what an internet search using the words “colorful insects” produced, their disappointment vanished, and they eagerly pulling out their Chromebooks to find their own bug references.
I told students they had to choose an insect with a substantial amount of color, as the emphasis on the project was color and value blending. Because bilateral symmetry was another major focus of the project, an overhead view was crucial.
Drawing Them Out
After a discussion on bilateral symmetry in nature and how it applies to insects, I showed students how to fold paper to achieve a vertical y-axis. Students then used an 8 x 10" (20 x 25 cm) piece of tracing paper to draw half of their insect along the folded y-axis. Once the student and I were satisfied with the result, the folded paper was flipped over and the drawn side was traced onto the other half. Once completed, students unfolded the tracing paper to discover a perfectly symmetrical insect drawing.
Transferring and Rendering
Finished drawings were placed over a torn piece of roofing felt and taped into position. A piece of white transfer paper was placed under the drawing. Using a pencil, students drew over their tracing paper drawings to transfer the image to the felt.
The next step was to have students work on scraps of roofing felt using oil pastels to practice value and color blending scales. I demonstrated the use of a tortillon and a lighter color pastel for blending. Because many of the insects contained small details, I let students practice with colored pencils as well.
Students rendered their final drawings using both colored pencils and oil pastels. The white transfer lines initially helped them achieve contrast in their work. Then I demonstrated how the line could be blended more softly and naturally with a white soft core pencil. The highly textured surface of the felt allowed oil pastel and colored pencil to work well together. Once rendering was complete, students chose a color that would complement their drawing and created a decorative border around their work.
From Ew to Wow
The completed drawings were mounted on tag board and displayed outside the classroom. As students looked at the display, they were surprised and impressed at how successful the entire class had been with this project. I thought about their reaction to the subject matter and it had gone from “Ew” to “Wow!” and I couldn’t help but smile.
Michael Sacco is an art teacher in Three Village Central School District, Long Island, New York. occasm@gmail.com
National Standard
Connecting: Relate artistic ideas and work with societal, cultural, and historical context to deepen understanding.
Art teachers encourage a love of nature through various lessons using a STEAM approach, unusual materials, visits to an aquarium and an alpaca farm, and more. Students illustrate fantastical reimaginings of nature photographs; demonstrate a knowledge of color and value blending with bilateral insect drawings; team with a botanical preserve to create a butterfly mural installation; collaborate on a large-scale ceramic school garden; and more.