 |
 |
 |
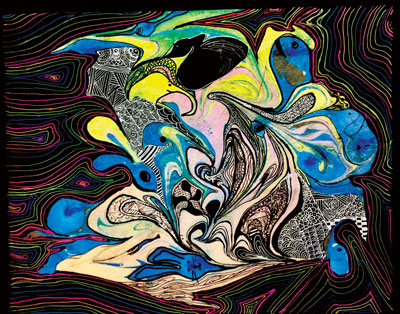 |
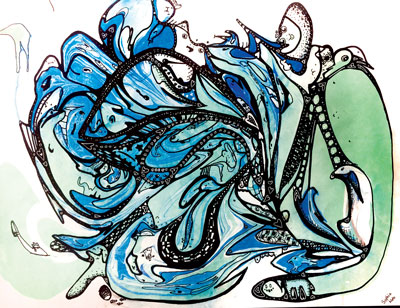
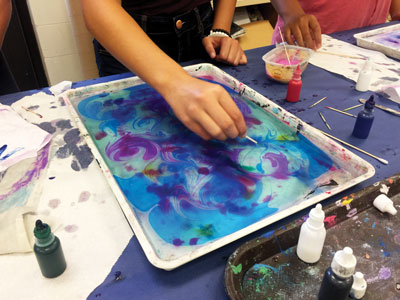
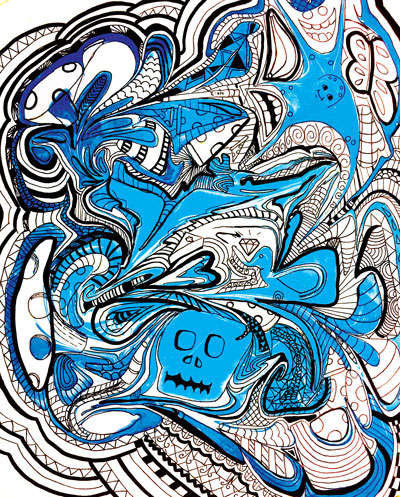
| Top to bottom: Sophia N., marbled monoprint. A student adds drops of marbling ink into a tray with marbling mix. A perfect example of line and movement. Students were encouraged to turn their paper in all directions and use a permanent marker or gel pens to draw back into the artwork. |
This is a natural STEAM lesson, as its success depends on the effect of surface tension—the tendency of fluid surfaces to shrink into the minimum surface area possible. This phenomenon occurs because molecules in the liquid are attracted to each other, which is the science behind many of the behaviors of liquids, including raindrops. For example, surface tension allows insects to travel on the surface of water. In paper marbling, surface tension allows paint or pigment to float on the surface of a liquid and then be transferred to paper or fabric.
Preparation
There are many marbling kits available and methods to try. We used large flat trays, combs, forks, and toothpicks for stirring, and lots of paper towels for blotting. I found it necessary to play around with the mixture to get the consistency just right, so I suggest you first try it on your own to work out the kinks. I prepared the marbling mixture in large tubs a day in advance.
I filled the trays with about 2" of marbling mix and set up four trays and stations for a class of sixteen to eighteen students. We reused the mixture in the trays over the course of several classes. Occasionally I topped it off with fresh mixture, but it’s not necessary to dump it and start over every day. I limited students to three colors to save time and because the trays get dirty faster when using more colors.
Making Monoprints
Students made monoprints, as each print pulled was unique. They added colors to float on top of the liquid mixture by dropping dots from an eyedropper or small squeeze bottle. When sufficient color had been added, they used tools such as combs, forks, and toothpicks to manipulate the paint on the surface of the water.
When the surface design was complete, students carefully laid their paper on the surface of the liquid, let it sit briefly, and then pulled the print. You can use any type of drawing paper— even printer paper. After a pull, allow the excess liquid to drip off of the paper into the water. You may need to gently blot the prints with paper towels before laying them on newspaper to dry. I occasionally swiped the top layer of the marbling mix with cheap copy paper to get a cleaner surface for the next student (thus making a ghost print).
Embellishment
After students finished marbling their papers, I thought, “What else can we do with these?” I decided to turn them into creative thinking/problem-solving illustrations with my students. I had each of them create a minimum of four paper marblings. When these were dry, I asked them to choose one to draw on. Students spent time looking at their work and turning it in different directions. I encouraged them to find inspiration and images in the marbling.
The work could be an entire theme-related illustration or include random objects. The choice was theirs and the creativity flowed. Most used black permanent markers and some also used gel pens. We discussed ways to make the drawings more interesting, such as using line variety and thickness, hatching, cross-hatching, and stippling.
The results are always impressive, creative, unique, whimsical, and fun! Try it with your students for an engaging and novel lesson that owes its success to science and your students’ creativity.
Donna Cariola is an art teacher at Timberlane Middle School in Pennington, New Jersey. donnacariola@ icloud.com
NATIONAL STANDARD
Creating: Generate and conceptualize new artistic ideas and work.
WEB LINK
Marbling: bit.ly/2IHz3xi
View this article in the digital edition.