 |
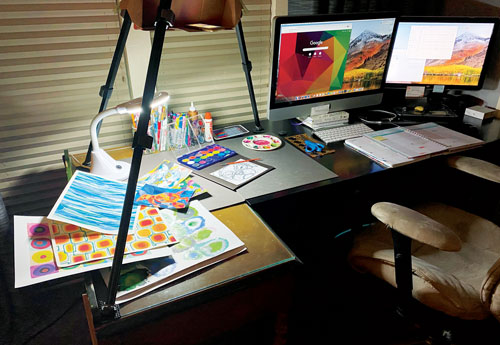
| My indoor virtual art studio and workspace. A cardboard shelf attached to a tripod holds my phone for filming demonstrations. |
If the technological logistics of teaching fine arts online seems daunting and overwhelming, here are some steps you can take to get a virtual art studio up and running with minimal expense.
Minimum Requirements for Success
First, select an online platform where you’ll post assignments and accept student submissions. Confirm your selection with your district technology department before setting everything up. Now you’re ready to build your recording studio— a place where you can host virtual classes, hold office hours, and produce videos for demonstration and instruction.
Establish a Filming Location
Consider the quality of light in your virtual studio. Diffused natural light will make your content easier to see. A large desk in front of a window is ideal. Add a desk lamp for when you need more light. Cover the desk with a dark matte poster board to reduce glare.
A cardboard shelf attached to a standard tripod will hold your phone, tablet, or camera for filming demonstrations. Positioning the workspace next to a computer makes it easy to monitor virtual classrooms while simultaneously using a phone to show the art-making process. Decide which cameras you’ll use to create video or host live streaming and build the workspace to suit the device.
Create an Image Folder of Supplies
Photograph all potential art supplies and store them in a folder on your desktop. Use the same images at the beginning of every virtual lesson for students to have a clear understanding of what supplies to gather ahead of time. During pandemic-related closures, realize that most students will not have supplies at home and offer variations on each lesson to accommodate a variety of supplies.
Filming and Editing
Before filming, work out the sequential order of video and stills as a checklist. Keep your student learner profiles in mind and incorporate written, spoken, and visual instructions into your prerecorded lessons. Since demonstrations take a considerable amount of time to execute, use time-lapse video to control the speed of production and show the demonstration from start to finish.
Prerecorded demos simplify faceto- face virtual instruction and allow you to post the video to your online platform for unlimited access. You can also edit your videos using a number of free apps to adjust speed control, cropping, and filters.
When filming, demonstrate technical skills slowly as younger students may have a hard time following if you go too fast. Use time-lapse footage to show progress over a long period of time, and use regular speed footage to demonstrate specific skills.
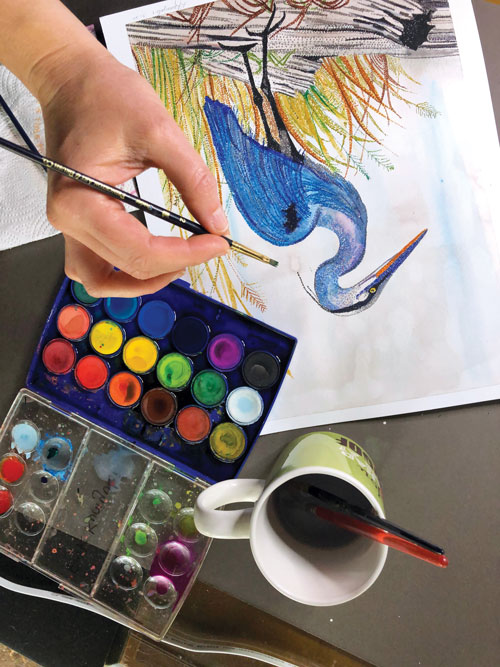 |
| A well-lit workspace makes it easy to see the artwork and the process unfolding. |
Audio Booth
Using your computer’s microphone for recording will pick up ambient noise that distracts from your content. Purchase a quality computer microphone, or shut yourself into a closet full of clothes. The clothes will absorb the distracting ambient noise, and the result will be a clear professional- sounding recording of your voice. Instead of talking during demonstrations that are prerecorded, take the finished video into the closet and narrate the steps as a voice recording. Upload the voice recording in postproduction and synchronize the audio with the visual recordings.
Post-Production
Post-production is undoubtedly the most difficult part of creating content for virtual instruction. Shooting and uploading a demo in one take can be accomplished with just a phone. For longer videos, the following free programs will allow you to assemble more than one clip: Openshot, Lightworks, iMovie, Windows Movie Maker, VSDC Video Editor, and VideoPad.
I’ve been using the timelinebased video-editing app Adobe Premiere Pro, but there are plenty of professional-quality apps available to fit your needs. First, I film all of the individual components, including audio tracks, and save them in a labeled folder on my desktop. Once in the app, I drag and drop my photos and video clips into their correct sequence, add the audio on a separate channel, and then export the video at the specifications for YouTube or Vimeo. The app exports the finished product to my desktop as an mp4 file that I can later upload to my online platform.
Following these steps will prepare you to create content for the next unexpected school closure. Check out our Facebook page below to learn more and see examples.
Karyn Kuniyuki is the director and art teacher at the Emmanuel School of Fine Arts in San Angelo, Texas. karyn@emmanuel-sa.org
RESOURCE
Emmanuel School of Fine Arts: facebook.com/esofasanangelo/
View this article in the digital edition.