As part of a project-based learning exploration, I coordinated with our librarian for a list of major topics represented in our book collections. My idea was to have students create sculptures from plastic wrap and tape, inspired by the Work of artist Mark Jenkins, to display on top of the shelves and represent the genre of books housed there.
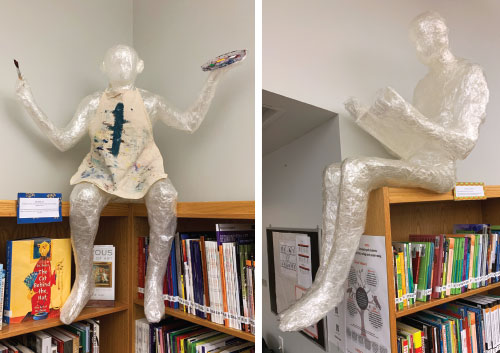
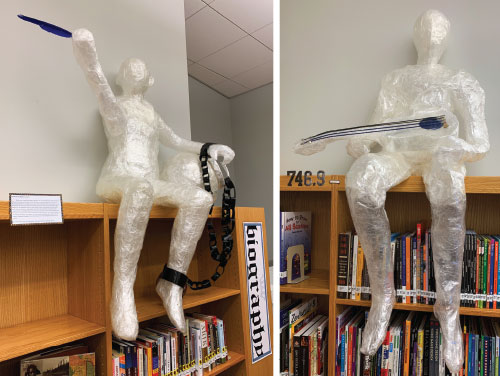
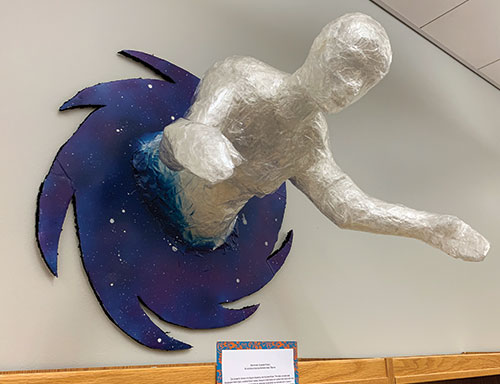
Plastic wrap and tape sculptures inspired by the art and self-help sections of the school library.Plastic wrap and tape sculptures inspired by the biography and music sections of the school library.Plastic wrap and tape sculpture inspired by the sci-fi section of the school library.
As part of a project-based learning exploration, I coordinated with our librarian for a list of major topics represented in our book collections. My idea was to have students create sculptures from plastic wrap and tape, inspired by the work of artist Mark Jenkins, to display on top of the shelves and represent the genre of books housed there. This was a large undertaking and would take lots of planning.
We began with a figure drawing unit. I provided props, and students took turns drawing each other in classical poses. They learned how to create figures to proper scale (eight heads high). After this unit, I presented students with the sculpture challenge.
Choosing the Designs
Each student received a worksheet with directions to select three book genres and sketch thumbnail ideas. They worked with a partner to create larger drawings of their thumbnails, incorporating figure drawing techniques. I kept a list of who was selecting what to ensure all genres would be represented.
I then asked students to share their work with three of their peers and select what they felt was their strongest idea. These were put out for judging. Each student was given two sticky notes to cast two votes, and they weren’t allowed to vote for their own work. The creators of the chosen designs would become leaders in a group of four to create the final designs.
Photographing the Space
Our next step was to make sure the sculptures would fit on their respective shelves. We took a trip to the library to photograph where the figures would go and the teams considered the changes they would need to make. No figure could be standing because its height would break fire codes, so all sculptures had to kneel, lay down, or sit on the shelf.
Inspired by Artist Mark Jenkins
After watching several videos on YouTube about sculptor and installation artist Mark Jenkins, students practiced by wrapping just one lower arm in plastic wrap. The plastic wrap allowed a small gap for cutting and helped protect skin and clothing. (We saved all the taped practice arms and gave them to the Horror Fiction group.)
Practical Considerations
Sometimes Jenkins will wrap with tape sticky side out and then sticky side in with no plastic wrap. I experimented and found this method was too tight, and the final sculpture was too flimsy. Plastic wrap and four to five layers of tape worked great. For the heads, we used foam mannequin heads.
One important tip we learned from watching Mark’s videos is to cut one-foot strips of tape and apply them to the figure rather than wrapping the body straight from the roll, which made the tape too tight. Once a lot of tape strips were on, some careful wrapping could be done from the roll.
We used safety envelope cutters to cut the plastic. Scissors do well but need to be cleaned often with rubbing alcohol as they get gummy. We used three rolls of 100-yard packaging tape per adult-size figure.
The Sculptures Near Completion
Students wrapped body parts one at a time. We did arms, body trunk, legs, and then heads and props. We found that legs needed to go high up on the hips and arms needed to be placed almost all the way up to the neck to create some overlap for strength when reattaching.
When wrapping the trunk, we asked models to smooth the tape themselves. The tape needs to be smoothed before it’s cut; once it’s off, it’s hard to compress again. We used tape to seal the figure back up, attach parts, and added pieces of clear acetate to strengthen various parts.
Presenting
Students created a small plaque explaining their final sculptures and how they represented the genre. Once the work was on display, I had planned to send out a note to my administrators and colleagues, but they all barged in my room within minutes, talking about how awesome the work was! Though this was a huge undertaking, it was well worth it.
Eric Gibbons is the author of the blog Art Ed Guru and an art teacher at Vernon Malone College and Career Academy in Raleigh, North Carolina. LovsArt@aol.com
National Standard
Presenting: Develop and refine artistic techniques and work for presentation.
Art teachers celebrate student success through a variety of collaborative and group-focused assignments. Two educators forge a partnership to teach students about African arts and culture, while another educator creates an opportunity for students to paint with their feet. Students also work together in small groups to complete table-sized craft paper drawings; team up with a Chicago muralist to complete an outdoor mural; participate in a school library sculpture challenge; and more.