My idea for this lesson was inspired by a visit to Watkins College of Art in Nashville during our Tennessee Art Education Association’s state conference. While walking to one of my sessions, I noticed some college student design boards lining the hallways, so I took some photos and filed away the idea. I knew I wanted to connect this as an extension to the lesson in one-point perspective drawing that my seventh-grade students were completing while I was away at the conference.
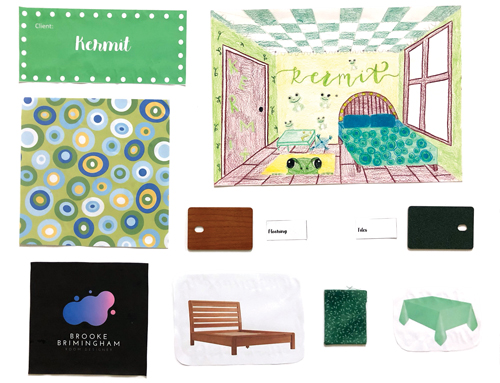
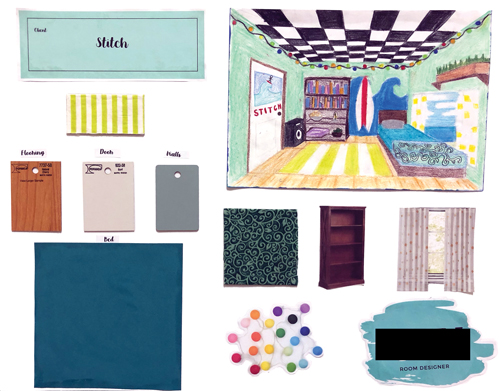
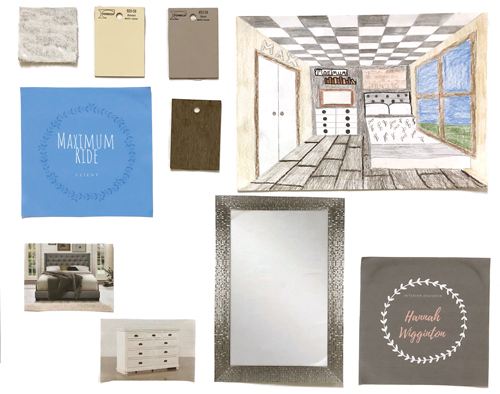
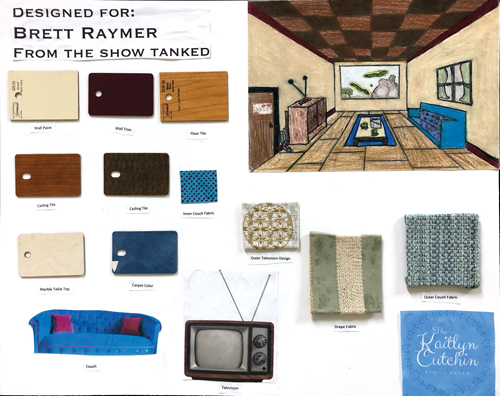
Brooke B., room designed for Kermit.Genevieve G., room designed for Stitch.Hannah W., room designed for Maximum Ride.Kaitlyn C., room designed for Brett Raymer.
One of the best ways to advocate for the arts within the classroom is to provide opportunities for students to see practical ways that art can be used in future careers. With the influx of home design programs flooding the media, students flipping through channels or surfing the web are bound to notice this trend as well.
Connecting to Perspective
My idea for this lesson was inspired by a visit to Watkins College of Art in Nashville during our Tennessee Art Education Association’s state conference. While walking to one of my sessions, I noticed some college student design boards lining the hallways, so I took some photos and filed away the idea. I knew I wanted to connect this as an extension to the lesson in one-point perspective drawing that my seventh-grade students were completing while I was away at the conference.
For years I’ve shared a tutorial on linear perspective with students where I draw along with them. It’s a simplified approach, but it seems to engage students who process at different levels. Once we go through the basics together, students who need more time can return to the website for a review, or I can guide them individually.
Design Criteria
After students feel they have mastered the basics, I give them criteria for designing a room for a client of their choice. This room can be for a celebrity, a fictional character, or a historical figure. Leaving these options open to students allows them to feel more connected to their project. I create a list of required components for the design so I can assess students’ ability to adapt what they learned about perspective to their final drawing.
This year, as an extension to this lesson, I pulled out scraps of upholstery fabric, laminate, and scrapbook papers for students to use as samples on their boards. I instructed them to select coordinating colors and textures while keeping the aesthetic choices of their client in mind. I provided scrap pieces of matboard to use as backing for the fabric samples to give the project a more professional look. I also required them to add magazine clippings of accessories such as lamps, mirrors, furniture, and appliances.
After selecting these samples, students were instructed to incorporate these colors, patterns, and textures into their room designs using colored pencils. This process allowed them to see how the colors and textures would look before applying these elements to their drawings. This also allowed them to experiment with the colored pencil medium by mixing and blending colors to match their choices.
Next, I asked students to create labels for their boards that included their own designer logo and a label for the client. One student even found a free website for making logos and shared it with the class. Other students decided to create original logos using Photoshop and other software.
Final Touches
Foam board was used for all of the designs and samples to be mounted on; nothing was glued down until I observed the layout, prompting students to use the space optimally. I was impressed to see that most of them made wise choices compositionally while keeping their lines, colors, and shapes well-balanced. Finally, students wrote an artist statement explaining their choices for the design and why they believe those choices would meet the approval of their client.
Reflections
These design boards became very popular throughout the school after they were displayed in the hallway. Some of our middle-school artists suggested they might make additional boards to help design their own rooms. This lesson introduced students to a practical way that the elements of art can be applied when making aesthetic choices and how the knowledge of drawing skills and the principles of design can give them a new “perspective” on art-related professions.
Melody Weintraub is a retired middle-school art teacher living in Tennessee. She is the president of the Tennessee Art Education Association. MelodyWeintraub@gmail.com
National Standard
Presenting: Develop and refine artistic techniques and work for presentation.
Art teachers spark students’ imagination with several approaches to design and introduce them to design-related careers. Young students recycle vinyl records into functional embellished sculptures, elementary students capture the elements of art and principles of design through digital photography, middle-school students master linear perspective drawing and create design boards for a celebrity or fictional character, high-school students design isometric digital rooms with depth and dimension, and more.